Usage Documentation
Project: XSTRIVE LLM-API Management Product | page_id: 1790
XSTRIVE LLM API Management Platform — User Guide
This document guides you through the complete usage flow from unboxing to getting started
Table of Contents
I. Hardware Instructions
1.1 Packing List
After opening the package, please confirm that the following items are complete:
| Item | Qty | Description |
|---|---|---|
| Main unit | 1 | XSTRIVE hardware box |
| Power adapter | 1 | For device power supply |
| Manual | 1 | Electronic version (no paper version provided) |
📌 Note: All products only provide an electronic manual. Please keep this document safe or visit the official website to download the latest version.
1.2 First Use
Step 1: Connect the Device
- Plug the network cable into the device network port
- Connect the power adapter; the device powers on automatically
- Make sure the computer and the device are connected under the same switch/router
┌─────────────┐      Network cable      ┌─────────────┐
│   Router    │◄──────────────►│   XSTRIVE box  │
│  /switch    │                │             │
└──────┬──────┘                └─────────────┘
       │
       │ Same network
       ▼
┌─────────────┐
│   Computer  │
└─────────────┘
Step 2: Search for and Configure the Device IP
-
Download the "Device Search Assistant"
- Download address: http://www.xstrive.com/download/ -
Run the Device Search Assistant to automatically search for XSTRIVE devices on the LAN
-
If the device cannot be found, check the 「Force Search」 option and search again
-
After finding the device, you can modify the device IP address (setting a fixed IP is recommended for easier access later)
1.3 Log In to the Management Interface
This device uses a web management interface for configuration and supports access from the following terminals:
- ✅ PC (recommended)
- ✅ Tablet
- ✅ Phone
💡 Google Chrome browser is recommended on PC for the best compatibility.
Login steps:
- Open the Google Chrome browser
- Enter the device IP address in the address bar (e.g.
[http://192.168.0.24)](http://192.168.0.24`)) - Enter the login interface of the "XSTRIVE LLM API Management Platform"
II. Software Instructions
2.1 Log In to the System
| Item | Default value |
|---|---|
| Username | admin |
| Password | admin |
⚠️ Security tip: After the first login, please change the default password immediately!
After a successful login you enter the platform main interface. The top menu bar contains the following function modules:
【Channel】、【Token】、【Redeem】、【Recharge】、【User】、【Overview】、【Log】、【Settings】、【Network Configuration】、【About】
2.2 Network Configuration
Configure the device network connection parameters to ensure the device is stably accessible.
Operation path: Top menu 【Network Configuration】
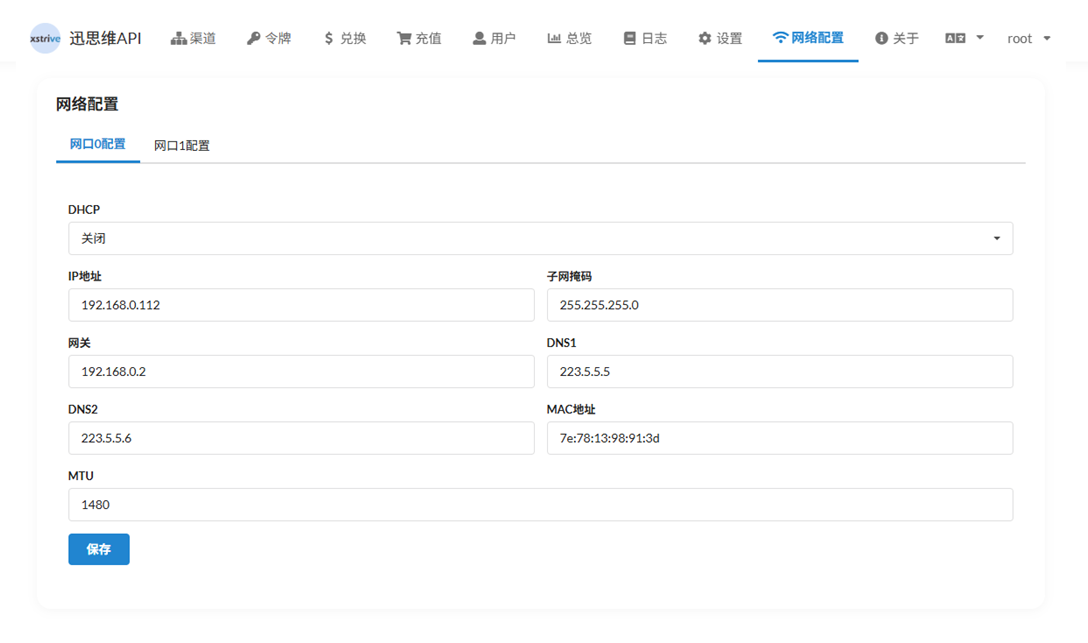
Configuration Item Description
| Configuration Item | Description | Example value |
|---|---|---|
| DHCP | When enabled, the IP is obtained automatically; when disabled, a static IP is used | Disabled (recommended) |
| IP address | The fixed IP of the device | 192.168.0.112 |
| Subnet mask | Usually 255.255.255.0 |
255.255.255.0 |
| Gateway | Router IP address | 192.168.0.2 |
| DNS1 / DNS2 | Domain name resolution server | 223.5.5 / 223.5.6 |
| MAC address | Device physical address (read-only) | 7e:78:13:98:91:3d |
| MTU | Maximum transmission unit | 1480 |
📌 Recommendation: Disable DHCP in production environments and use a static IP to avoid service interruption caused by IP changes. The device supports multi-network-port configuration (port 0 / port 1) and can be switched as needed.
2.3 Channel Management
A channel is the path connecting to upstream AI model service providers. Only after configuring a channel can the platform proxy calls to the major AI models.
Operation path: Top menu 【Channel】
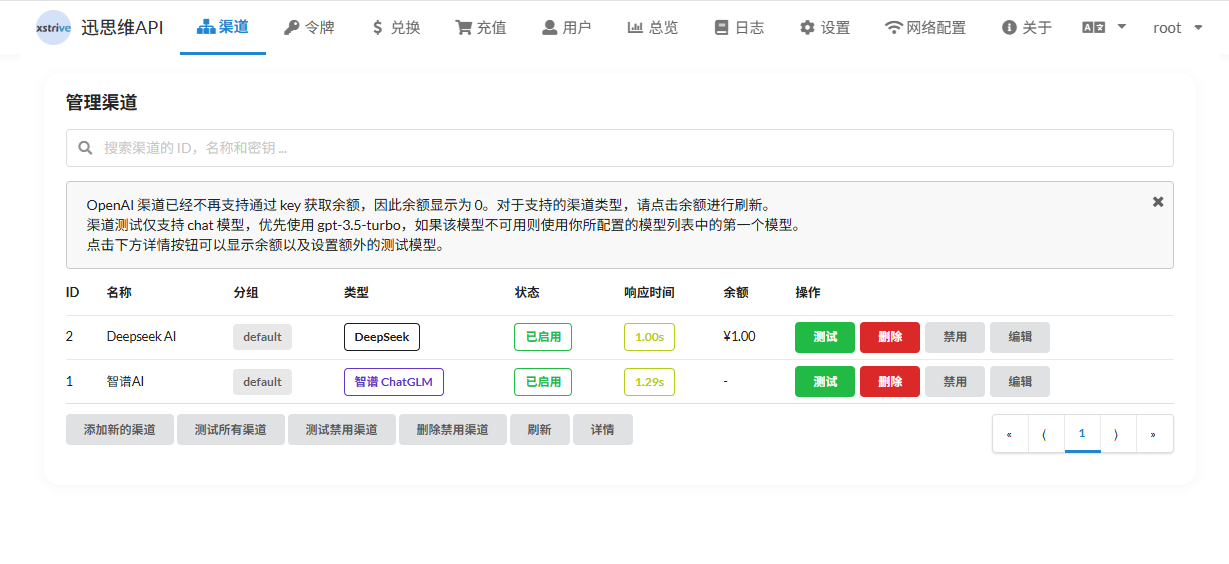
Channel List
- All configured channels are displayed in a table, including: ID, name, group, type, status, response time, balance
- Status indicator — 🟢 green "Enabled" means online and available, 🔴 means disabled
- Quick actions — each channel supports "Test" (check connectivity), "Delete", "Disable", "Edit"
- Batch operations — supports testing all channels, testing disabled channels, deleting disabled channels, refreshing the list
- Top notice — OpenAI channels no longer support obtaining balance through the key; manual refresh is required
Add a Channel
Click the 「Add New Channel」 button to enter the creation page:
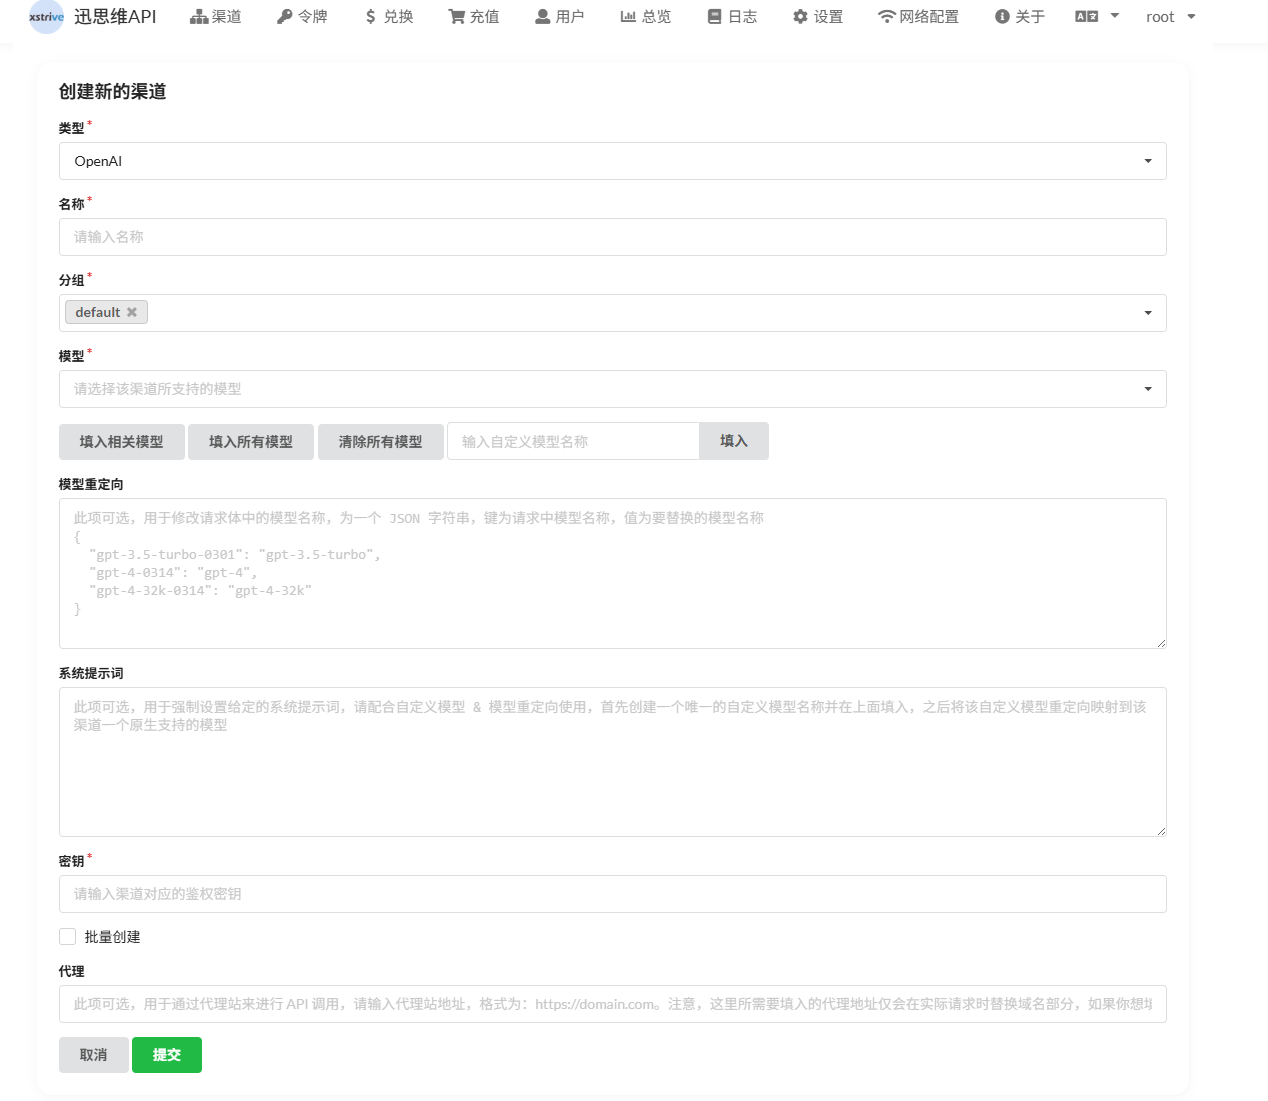
Required fields:
| Field | Description |
|---|---|
| Type | Dropdown selection (OpenAI / Claude / DeepSeek / ChatGLM, etc.) |
| Name | Custom name for easy identification |
| Group | Select or create a group (e.g. default) |
| Model | Select the models supported by this channel (can be filled in/cleared/customized in batch) |
| Key | The API Key of the corresponding vendor |
Optional fields:
- Model redirect — JSON format, used to modify the model name mapping in the request body
- System prompt — Set a default system prompt for this channel
- Proxy — Configure the proxy server address (format:
[https://domain.com)](https://domain.com`)) - Batch creation — When checked, multiple channels can be created at once
💡 Suggestion: Configure at least 2 channels and enable load balancing to improve service stability. API Key acquisition addresses for each vendor:
- OpenAI: https://platform.openai.com/
- Claude: https://console.anthropic.com/
- ChatGLM: https://open.bigmodel.cn/
- DeepSeek: https://platform.deepseek.com/
2.4 Token Management
A token is the credential for calling the API. Through tokens you can control which IPs can access, which models can be accessed, and the call quota limit.
Operation path: Top menu 【Token】
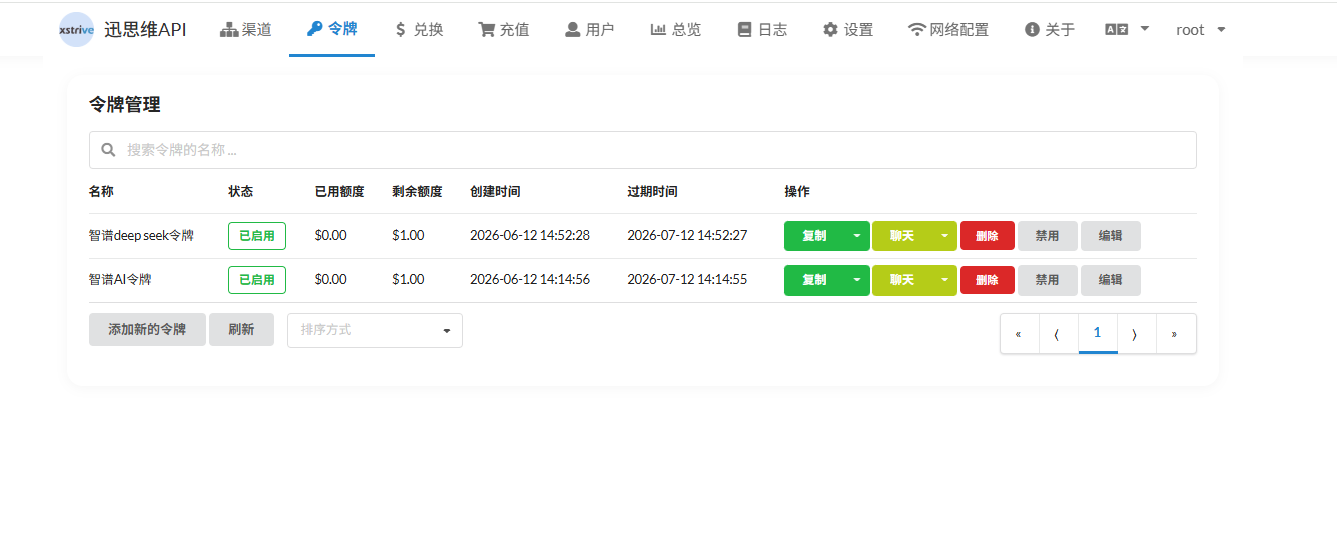
Token List
- All tokens are displayed in a table, including: name, status, used quota, remaining quota, creation time, expiration time
- Status indicator — 🟢 green "Enabled" means valid, 🔴 means disabled/expired
- Quick actions — each token supports "Copy Key", "Disable", "Delete", "Disable", "Edit"
- Sorting — supports sorting by multiple dimensions
Create a Token
Click the 「Add New Token」 button to enter the creation page:
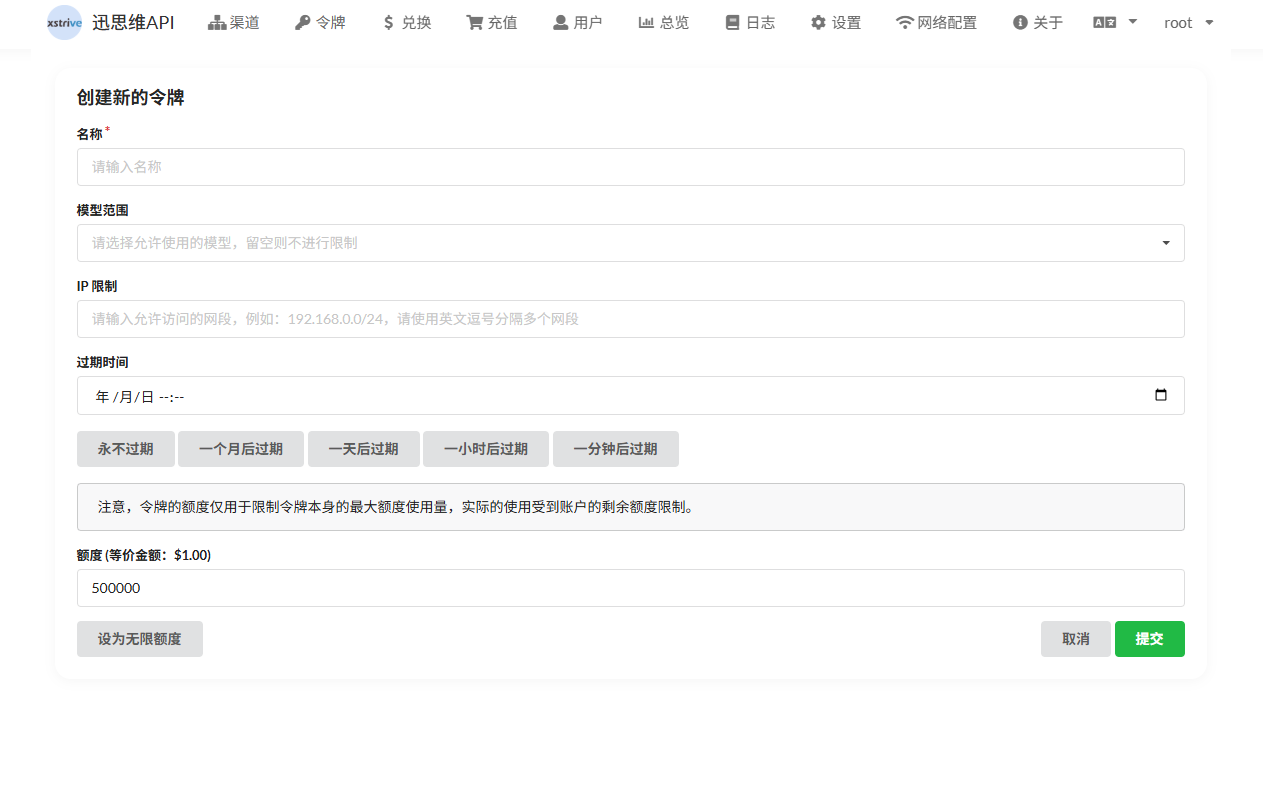
Configuration fields:
| Field | Description |
|---|---|
| Name | Custom name for easy identification (e.g. "dev test", "production environment") |
| Model range | Select the models this token can call (leave empty for no restriction) |
| IP restriction | Restrict the allowed IP segments (e.g. 192.168.0.0/24; leave empty for no restriction) |
| Expiration time | Set the token validity period, with quick options: never expire / one month / one day / one hour / one minute |
| Quota | Set the call quota upper limit (equivalent amount); can be set to unlimited quota |
⚠️ Note: The token Key is displayed only once at creation; please keep it safe! If lost, you need to create a new one. The token quota only limits the maximum quota usage of the token itself; actual usage is also limited by the account's remaining quota.
2.5 Redemption Code Management
Operation path: Top menu 【Redeem】
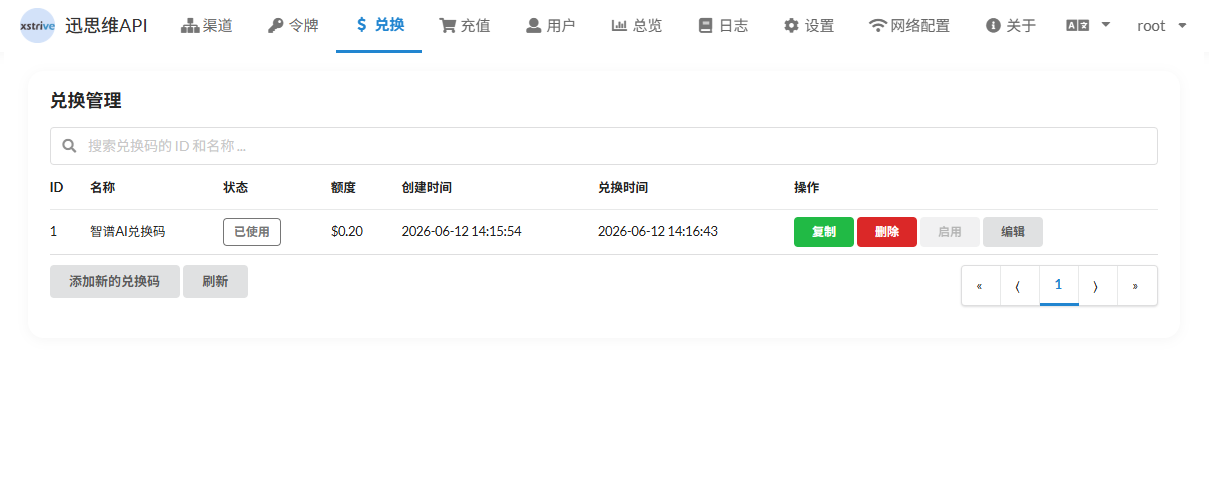
- Redemption code list — all redemption codes displayed in a table, including ID, name, status (unused / used), denomination quota, creation time, redemption time
- Search filter — supports quick retrieval by redemption code ID and name
- Batch operations — each record supports "Copy", "Delete", "Enable/Disable", "Edit"
- Create and refresh — add a new redemption code with one click, or refresh the list to get the latest status
💡 Applicable scenarios: education and training, enterprise internal purchase, user incentives; redemption codes can be generated in batches and distributed by email or QR code.
2.6 Recharge Center
Operation path: Top menu 【Recharge】
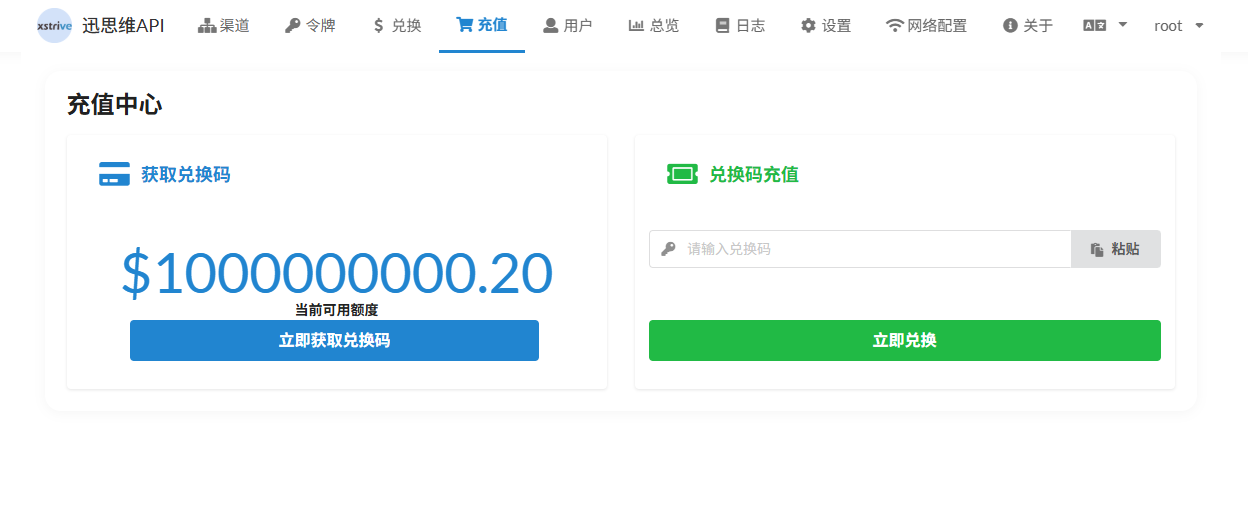
- Account balance — the current account balance is displayed in large type at the top (priced in USD)
- Get redemption code — click the button to get a new redemption code for distribution or personal use
- Redemption code recharge — after entering the redemption code, click "Redeem Now" and the denomination is automatically credited to the account balance
⚠️ The recharge center is for ordinary users. If administrators need to generate redemption codes in batches, please use the "Redemption Code Management" module.
2.7 User Management
Operation path: Top menu 【User】
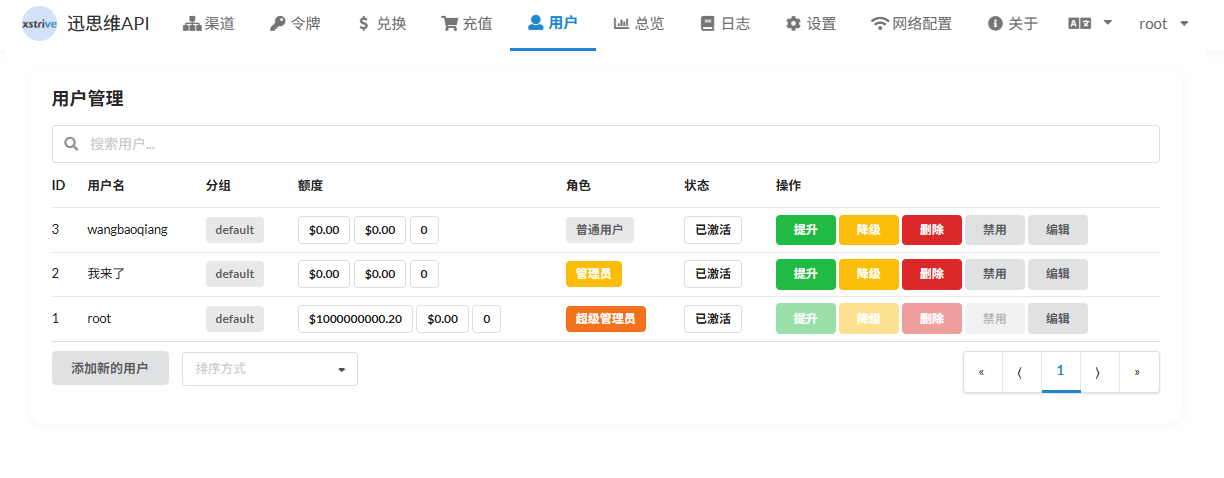
- User list — all users displayed in a table, including username, group, total quota, used quota, request count, role, activation status
- Role system — three-level role permissions:
- 🟢 Regular user — can only call the API and view their own data
- 🟡 Administrator — can manage users, tokens, channels and other operation tasks
- 🟠 Super administrator — has all system permissions (including settings and network configuration)
- Quick actions — each user supports "promote/demote role", "delete account", "disable/enable", "edit"
- Add user — administrators can manually create new user accounts
2.8 Overview Dashboard
Operation path: Top menu 【Overview】
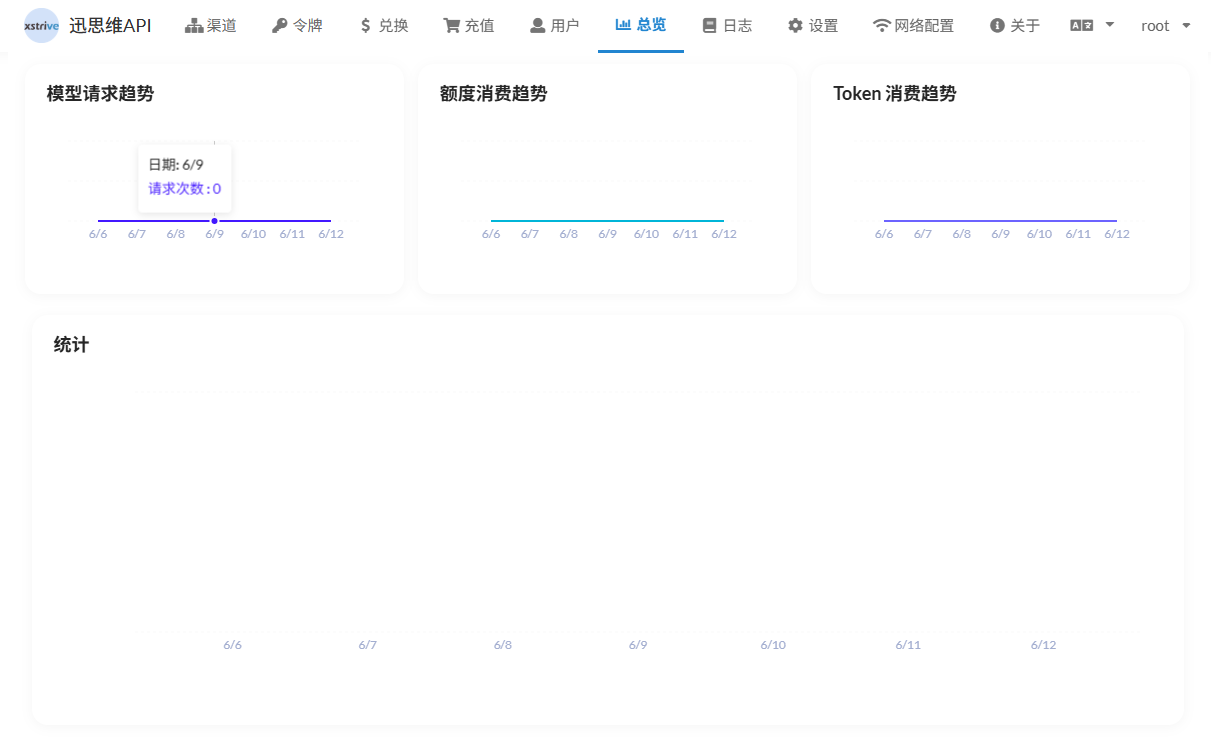
- Model request trend chart — a line chart showing the call volume of each model over time, identifying popular models and usage peaks
- Quota consumption trend chart — a line chart showing daily quota consumption, assisting cost forecasting and budget control
- Token consumption trend chart — a line chart showing the token usage trend, reflecting the actual scale of AI resource consumption
- Data for the last 7 days is displayed by default, and chart data is updated in real time
2.9 Logs
Operation path: Top menu 【Log】
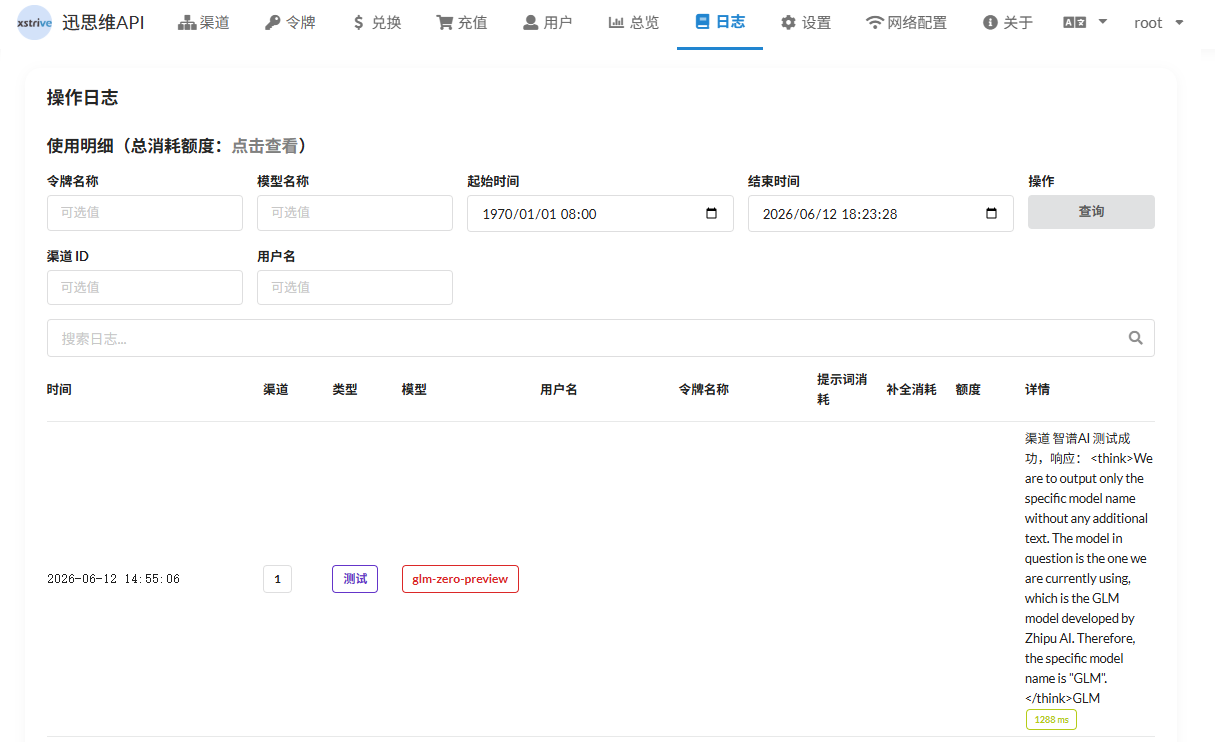
- Multi-dimensional filtering — supports combined filtering by token name, model name, time range, channel ID, username and other conditions
- Log detail table — each record includes timestamp, channel number, type, model name, username, token name, Prompt Token, Completion Token, deducted quota, and detail expansion
- Test replay — you can directly initiate a "Test" on historical logs to reproduce that request
- Full-text search — log content supports keyword search to quickly locate abnormal requests
💡 Logs are the only basis for billing reconciliation. It is recommended to export backups regularly and keep them for no less than 90 days.
2.10 Personal Settings
Operation path: Top menu 【Settings】→ Personal Settings
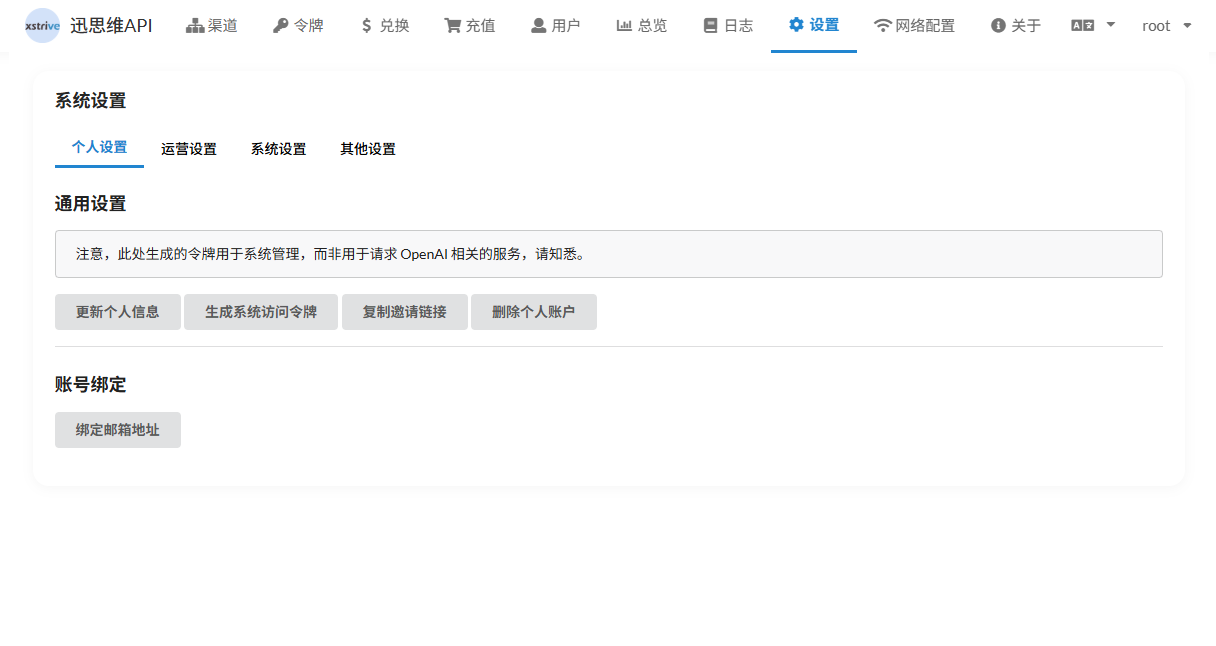
- General settings — displays the description of the system access token usage
- Quick actions — update personal information, generate a system access token, copy the invitation link, delete the personal account
- Account binding — bind or unbind an email address
2.11 Operation Settings
Operation path: Top menu 【Settings】→ Operation Settings
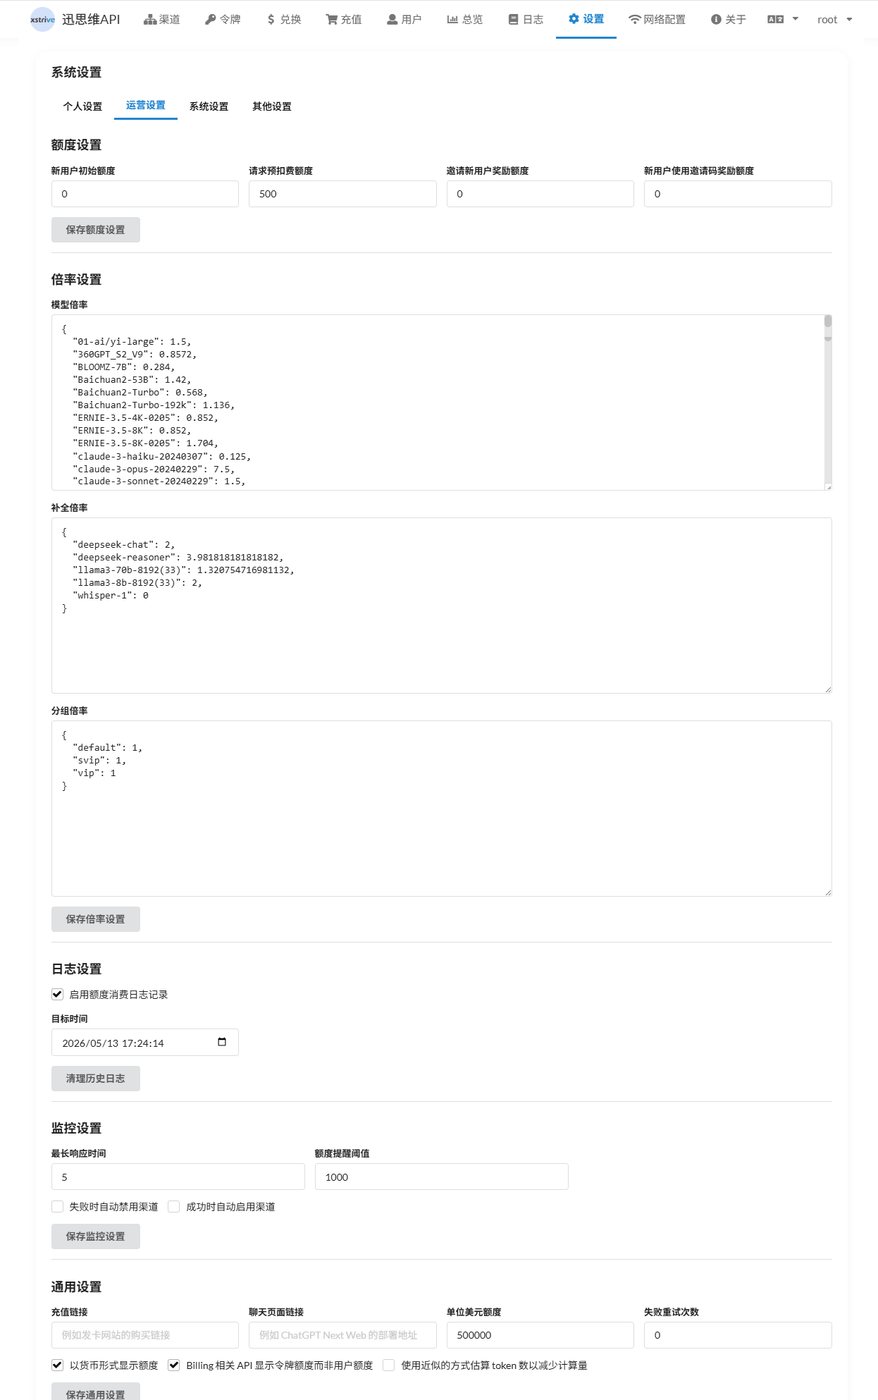
- Quota settings — new user initial quota, per-request deduction quota, invitation reward quota, etc.
- Rate settings — core pricing engine:
- Model rate — set a price rate for each model individually
- Completion rate — additional rate adjustment for the completion stage
- Group rate — different user groups enjoy different price rates
- Preset rates — mainstream model rates (GPT series, Claude, DeepSeek, ChatGLM, etc.) are built in, ready to use out of the box
2.12 System Settings
Operation path: Top menu 【Settings】→ System Settings
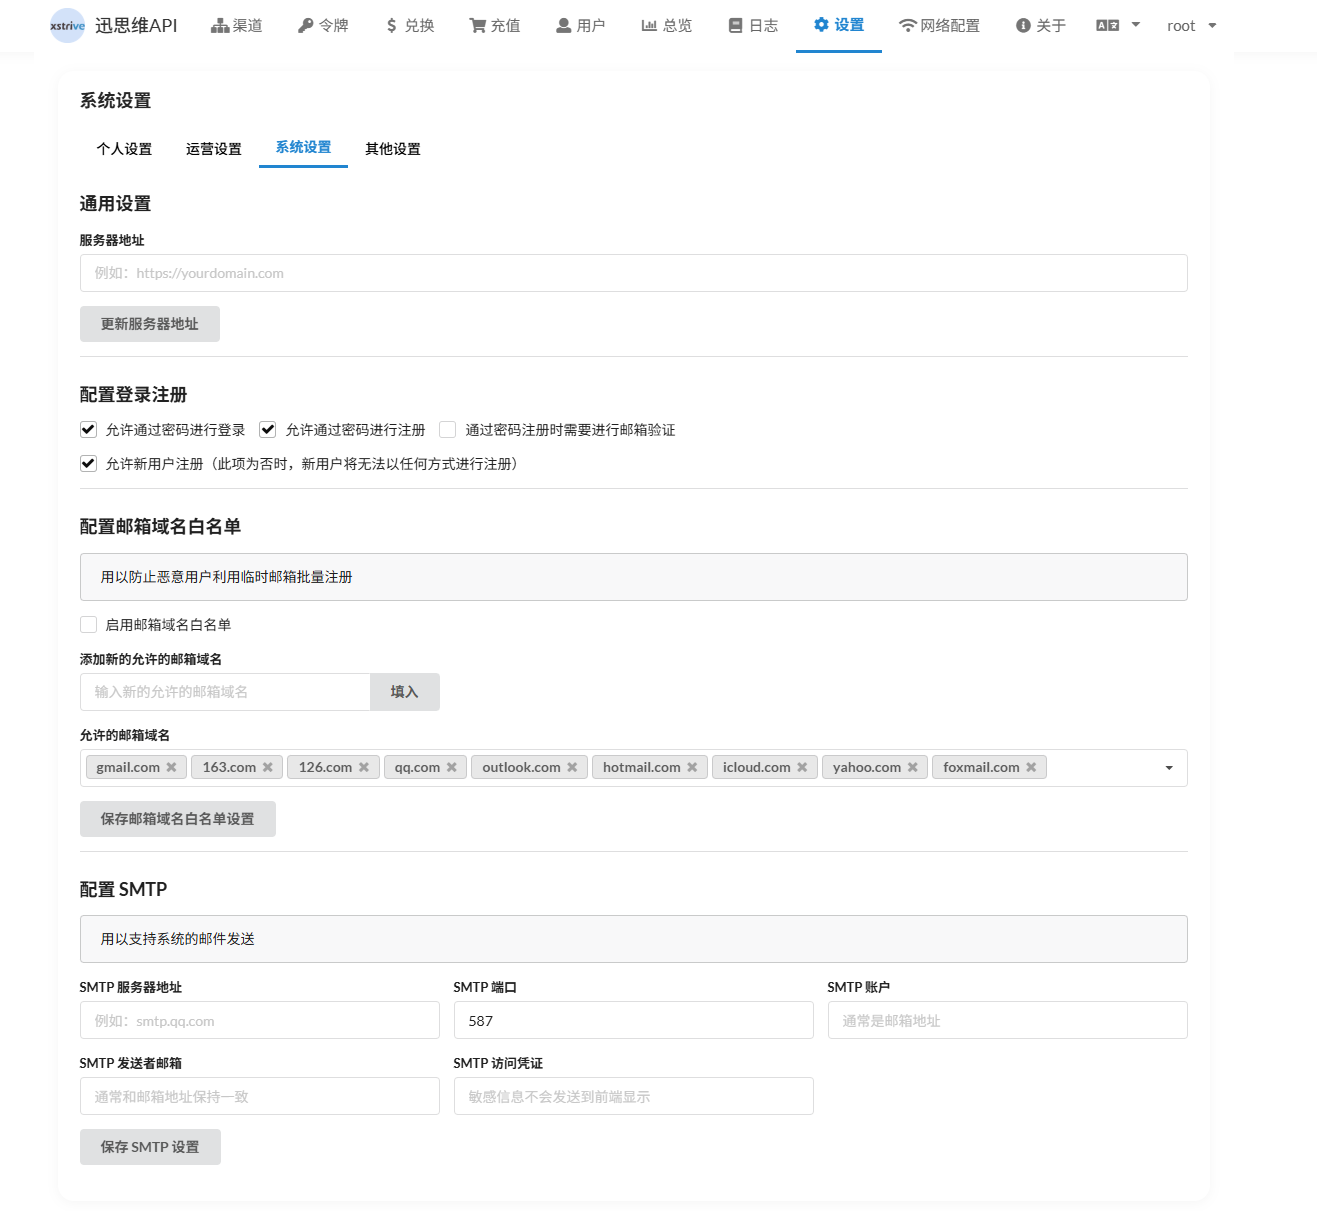
- Server address — set the system public network access address, which affects API endpoints and callback addresses
- Login and registration configuration — control the registration entry (password login / registration switch / email verification switch)
- Email domain whitelist — restrict registration to specific email domains only
- SMTP mail service — configure the mail server for sending verification codes and notifications
III. Visual Studio Code Binding Usage
The following describes how to configure the XSTRIVE LLM API platform in VS Code as an AI programming assistant.
3.1 Open the Chat Panel
- Open VS Code
- Click the 「Chat」 icon in the left activity bar (or use the shortcut
Ctrl+Alt+I)
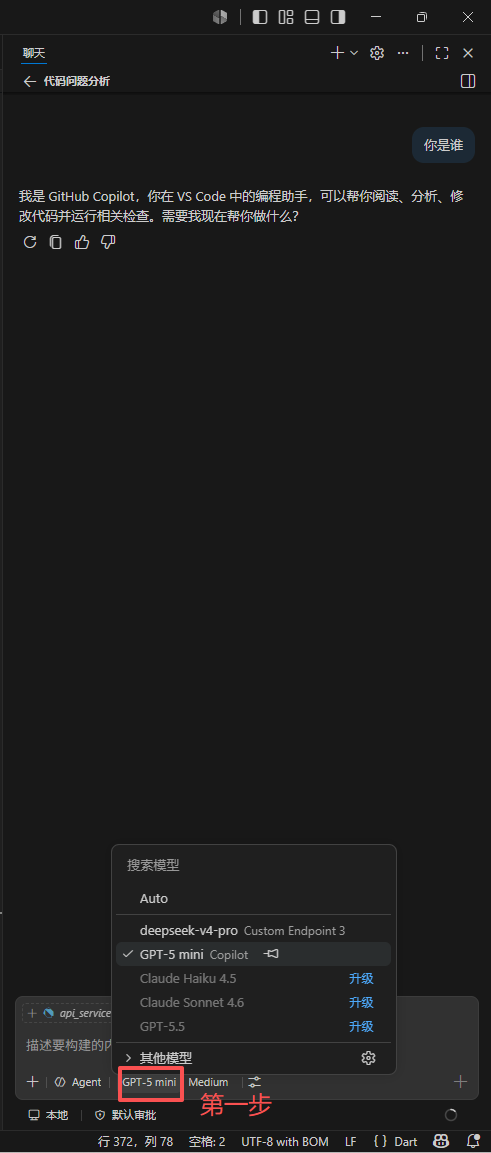
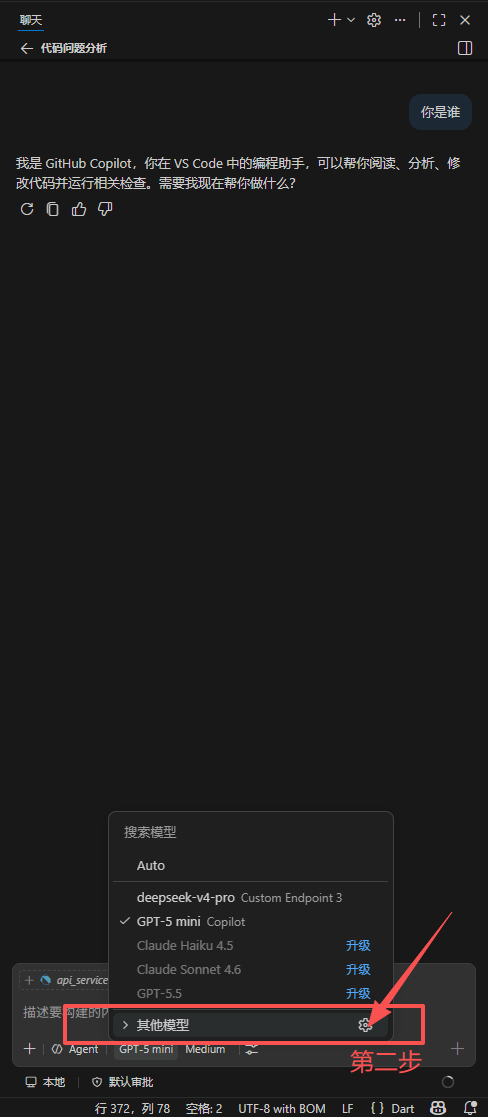
3.2 Add a Custom Model
- Click the 「Model」 dropdown menu and select 「Select Model」
- Select 「Other Models」 and click 「Manage Language Models」
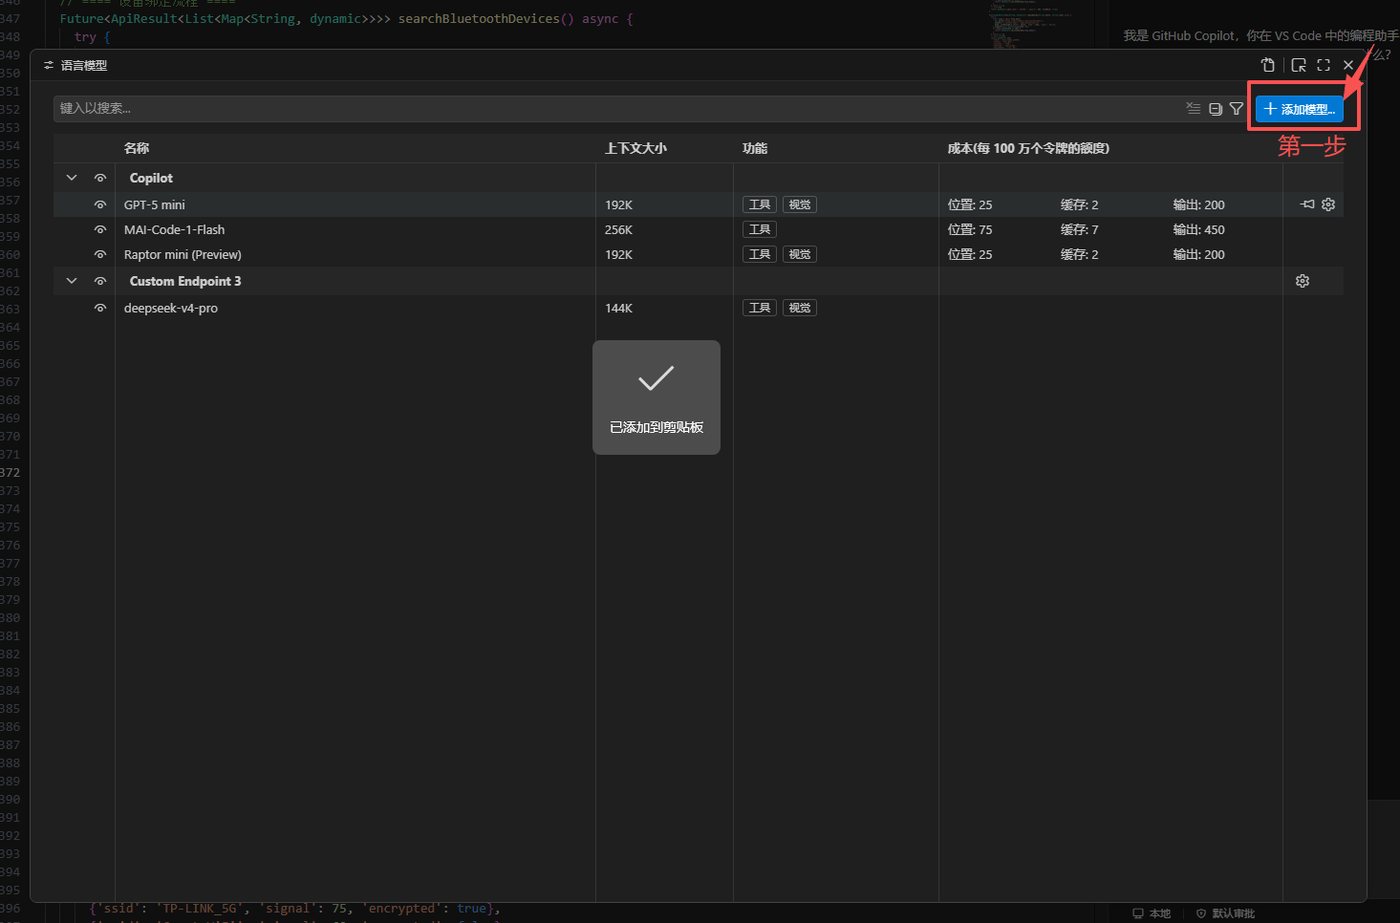
3.3 Configure Model Information
- Click 「Add Model」
- Select 「Custom」
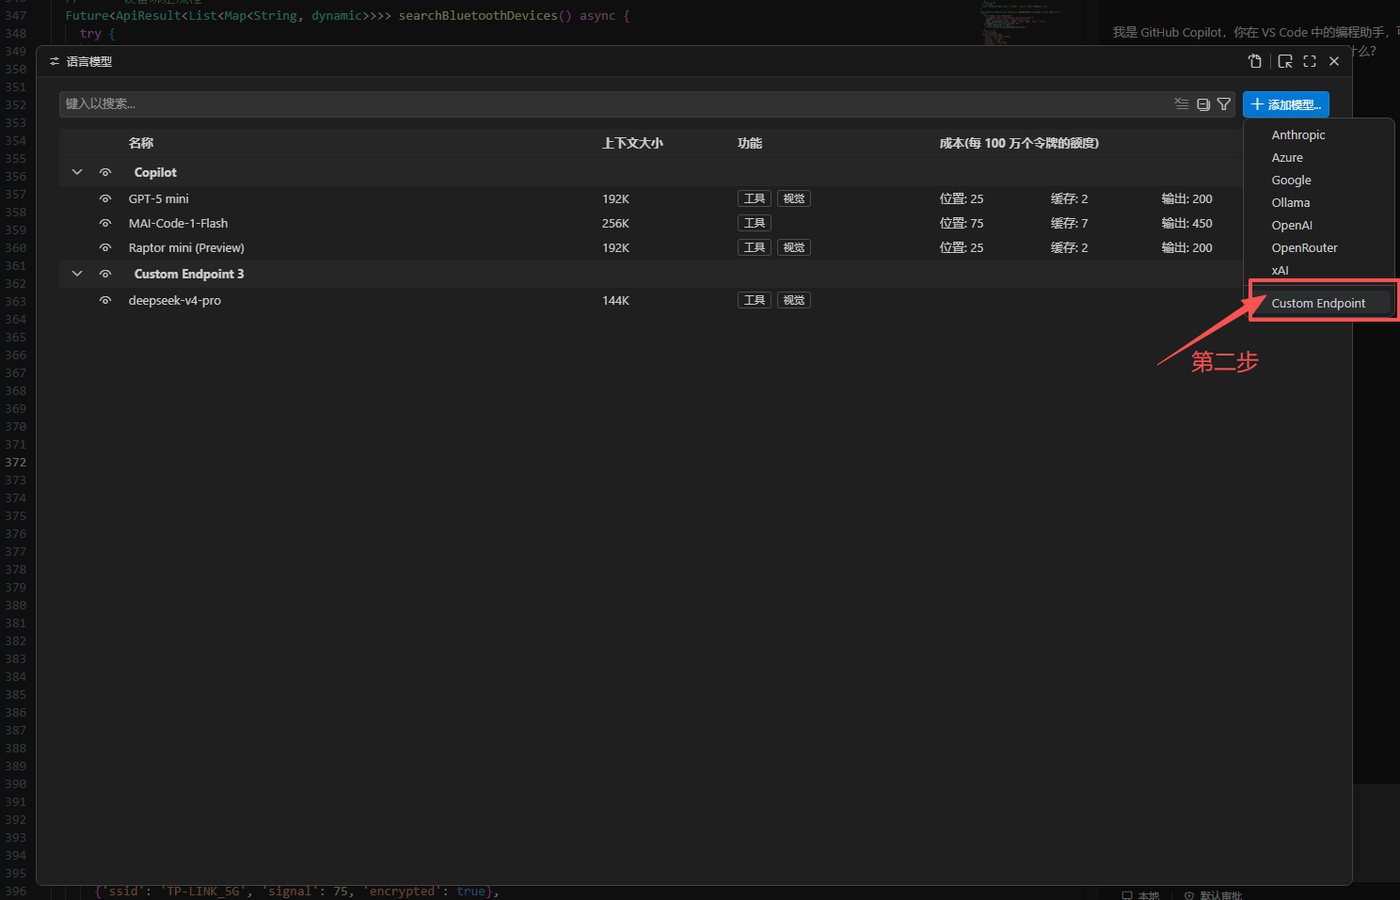
- Select a 「Group」 (you can create a new group such as "XSTRIVE")
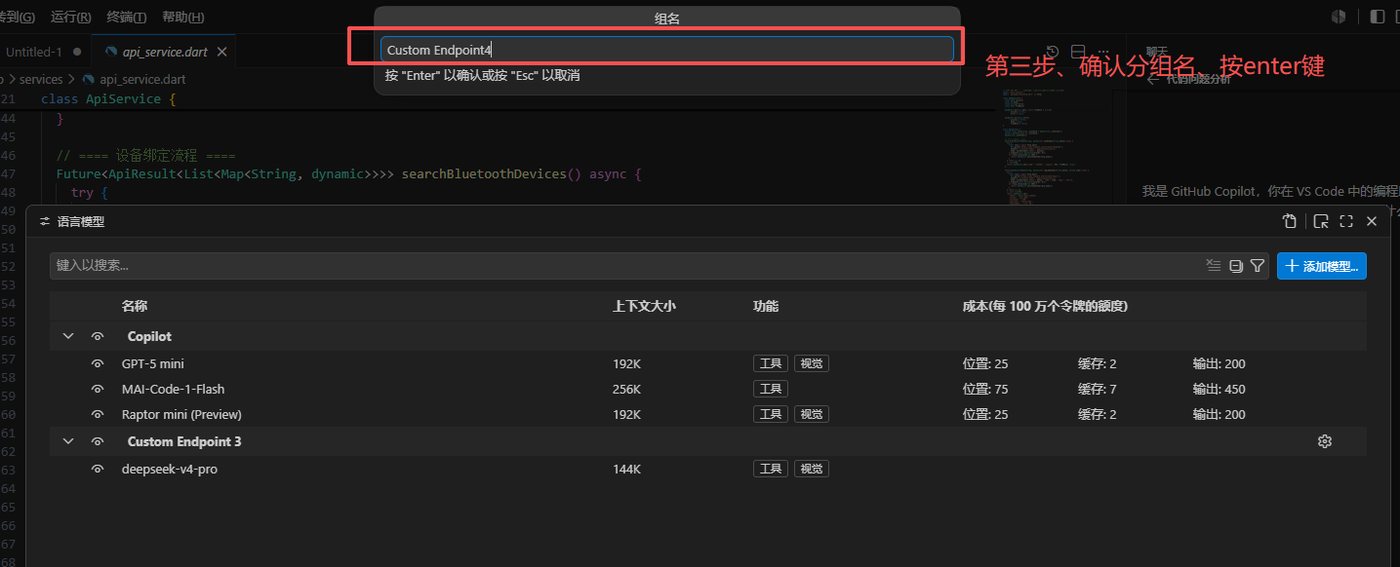
- Enter the Key: the Key copied in token management
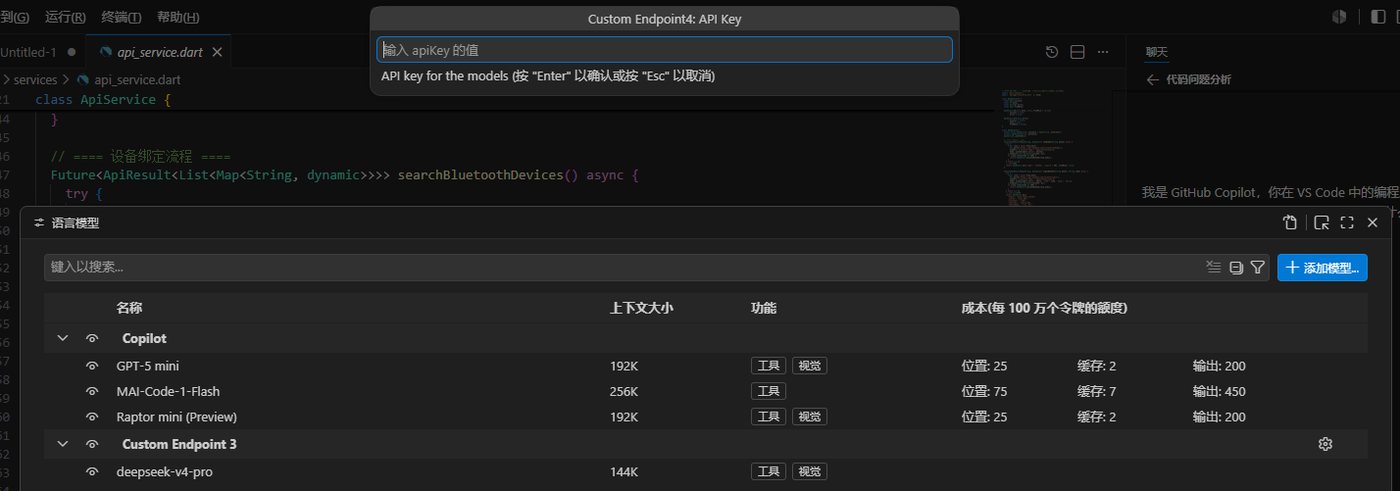
3.4 Fill In Configuration Information
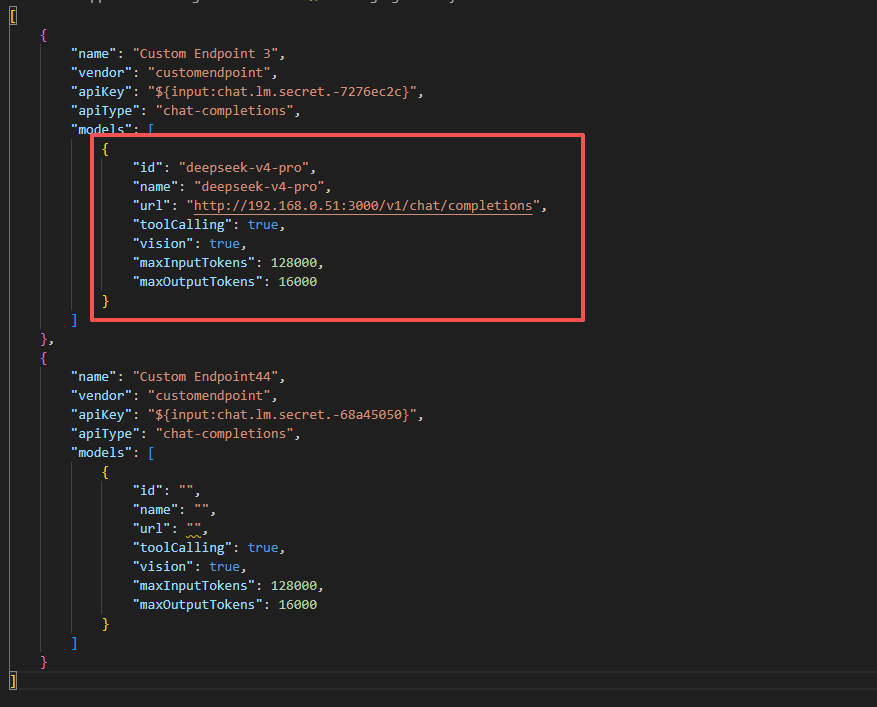
| Configuration Item | Description | Example value |
|---|---|---|
| id | Unique model identifier | gpt-4o or claude-3-sonnet |
| name | Display name | GPT-4o |
| url | API address (critical!) | See the URL assembly rules below |
| toolCalling | Whether tool calling is supported | true / false |
| vision | Whether vision is supported | true / false |
| maxInputTokens | Max input tokens | 128000 |
| maxOutputTokens | Max output tokens | 4096 |
🔗 URL Assembly Rules (Critical!)
[http://{deviceIP}:3000/v1/chat/completions?key={your](http://{deviceIP}:3000/v1/chat/completions?key={your) token Key}
Example:
[http://192.168.0.24:3000/v1/chat/completions?key=sk-DqobQ4SlBtcKQjft4445D2A6F43b498fA67d9fBd5bFc258c](http://192.168.0.24:3000/v1/chat/completions?key=sk-DqobQ4SlBtcKQjft4445D2A6F43b498fA67d9fBd5bFc258c)
| Component | Description |
|---|---|
192.168.0.24 |
Your XSTRIVE device IP address |
3000 |
Service port (default) |
/v1/chat/completions |
OpenAI-compatible chat interface path |
?key=... |
Your token Key |
💬 If you have questions: URL assembly configuration is relatively complex; you can consult customer service for one-on-one guidance.
3.5 Start Using
After the configuration is complete, select the model you just added in the VS Code chat panel and you can start AI-assisted programming!
IV. FAQ
Q1: The Device Search Assistant cannot find the device?
Solution:
- Confirm that the computer and the device are on the same network (same switch/router)
- Check whether the device power and network cable are connected properly
- Try checking the 「Force Search」 option
- Temporarily disable the computer firewall or antivirus software and try again
Q2: The page displays abnormally after login?
Solution:
- Switch to the Google Chrome browser
- Clear the browser cache and refresh the page
- Check whether the device IP has changed (if DHCP is used)
Q3: Channel test fails?
Solution:
- Check whether the API Key is correct (watch for spaces)
- Confirm that the Key is valid and has balance on the vendor platform
- Check whether the network can access the vendor's API address
- If a proxy is used, check whether the proxy configuration is correct
Q4: The model does not respond in VS Code?
Solution:
- Check whether the URL assembly is correct (especially the IP and Key)
- Confirm that the token has not expired and the quota has not been used up
- Check whether VS Code can access the device IP (same network)
- Check the XSTRIVE platform logs to troubleshoot